Pest Control for Sensitive Environments: Schools and Hospitals
Pests are organisms that damage or spoil crops, living things, or human settlements. They may also cause illness in humans.
Preventive measures include physical traps and baits, chemicals, and other environmental altering methods. Before using any pest control method, read the label and follow instructions carefully. When in doubt, consult a professional. Contact Pest Control Woodland Hills CA now!

Pests enter homes and businesses to look for food, water, warmth, and shelter. Keeping your property clean and moisture-controlled can prevent pests from entering, but you may need to take additional steps for complete prevention.
Clutter gives pests places to hide and breed, and debris buildup provides nesting materials. Store garbage in tightly-covered containers and dispose of it regularly. Keep kitchens and other areas free of crumbs and food scraps, and periodically wipe down surfaces. Remove stacks of cardboard and paper, which can also provide hiding places for rodents. Keep drains clean and declutter, and use steel wool to fill any cracks or crevices around pipes. Sealing entry points is another important step in preventing pests from entering your home. Check for any gaps under doors, around windows and in the foundation, and caulk any openings you find.
Some pests can cause significant harm, especially in business environments where they can disrupt production and damage the reputation of a brand. In these cases, pest control focuses on eliminating the pests and minimizing the amount of damage they cause, often in conjunction with other types of control methods.
Generally speaking, prevention is the most cost-effective method of managing a pest problem, and it helps to reduce the need for more aggressive treatments. In addition, it’s usually more environmentally conscious than relying on chemical pesticides to eliminate a problem.
While prevention can be as simple as wiping down countertops and vacuuming frequently, it’s crucial for business owners to maintain a clean and clutter-free property. This will make it harder for pests to get into the building and contaminate products, or spread diseases through droppings and saliva.
Having a plan in place to prevent pests can help you avoid costly repair bills, lost revenue and even fines. Facility, QA and GM managers will want to be as proactive as possible to protect their bottom line and avoid product recalls or having their product shipments rejected by clients.
Suppression
Pest control involves making life difficult for the organism by limiting its food, water and shelter. Preventive tactics are those that stop pests from entering the field, or inhibit their carryover into new areas, such as sanitation practices in storage facilities, the use of pheromones to confuse male insects and deter mating, or modifying conditions to make it unfavorable for growth. Sanitation practices include identifying and removing sources of food or shelter for the pest, such as open trash bins or plant debris. Good sanitation also involves reducing the chances of carrying pests to new areas, such as by using only pest-free seeds or transplants and ensuring that trucks and equipment entering a pest-free facility or leaving an infested one are cleaned properly.
Natural enemies (predators and parasitoids) suppress pest populations through a trophic cascade that reduces pest damage to crops. The strength of this effect is influenced by landscape configuration and the interaction of different natural enemy guilds.11
Studies have found that natural enemy complementarity is greater in crop fields with a higher proportion of seminatural habitats, compared to those with lower proportions. This may be because natural enemies that emerge from nearby seminatural habitats can reach the edges and interiors of crop fields more easily.
In addition to determining where the pest is, effective monitoring must take place to identify how much damage it is doing and the level of harm that is unacceptable. This information is used to determine the action threshold for the pest and set management objectives. In practice, this often means taking action only when the pest population is high enough to cause unacceptable damage.
Pest monitoring is essential to pest control because without accurate identification, no control measures can be applied. Identification includes knowing the physical characteristics of the pest, as well as its biology and ecology. This knowledge is crucial to achieving successful pest control, as the more you know about the pest, the easier it is to predict its behavior and limit damage. Accurate identification can also be a very economical form of pest control, as it eliminates the need for unnecessary treatment.
Eradication
Pests are animals or plants that interfere with human activity. They may bite or sting (like ants, bed bugs and spiders), stain or contaminate food (like cigarette butts and gypsy moths), and cause diseases in people and pets (like flies, mice and rats, and house centipedes and bees). Pests can also damage property (like houses and gardens) and spoil personal possessions (like clothes, fabrics and foods). Pest control aims to reduce the number of pests and the damage they do. This is achieved through prevention, suppression and eradication.
Eradication is a difficult goal in outdoor pest situations. Most pest control efforts involve prevention and suppression rather than eradication. In some cases, however, eradication is attempted if a foreign pest is accidentally introduced to an area. For example, the eradication of the Mediterranean fruit fly and gypsy moth is supported by government programs. Eradication is a more common goal in indoor pest situations, where the population is less likely to spread or disperse.
Threshold-based decision-making focuses on monitoring pest populations and acting when the pest reaches a certain threshold that is deemed unacceptable. This approach can help minimize the use of chemicals. For instance, the grower might choose to treat a field only when the pests eat enough of the crop to cause economic injury. This may allow the grower to extend the interval between treatments, reducing the amount of chemicals needed and limiting the number of times the crops are exposed to chemical residues.
Another way to reduce the use of pesticides is through biological controls. Using natural predators and parasites to control pests can significantly reduce the need for harsh chemicals. In addition, combining biological control methods with other techniques can decrease the use of pesticides even further.
Safe pest control is a team effort, involving building owners and managers, residents, maintenance workers, and other stakeholders. Everyone has a role to play, such as reporting maintenance issues and keeping living spaces clean to prevent pests from entering. In addition, building residents should understand how to prevent and avoid pests in their homes and workplaces.
Monitoring
The goal of monitoring is to determine whether a pest is present and to assess the population. This is a key step in integrated pest management (IPM) and can help decide when to start controlling the pest. It also helps determine if control measures are working.
In a crop field, the most common way to monitor for pests is visual inspection, which involves looking for signs of a pest on leaves or other plant parts. This can be done by hand or with a magnifying lens. It’s important to use the same person for inspections throughout the season so that they can develop a consistent pattern for spotting the presence of the pest.
Monitoring can be done for a wide variety of pests, including insects, insect-like organisms, nematodes, weeds, and vertebrates. With IPM, the goal is to set an action threshold – a point at which a pest’s numbers or environmental conditions indicate that control action is needed to prevent unacceptable injury or damage. Insect monitoring is an important part of determining when to take action, and it can also be used to predict the severity of a pest outbreak.
In addition to visual inspection, other types of monitoring include pheromone traps, sticky traps, and other physical controls. These controls kill or block pests or make the environment unsuitable for them. For example, a trap for rodents can keep them out of a facility, and a pheromone spray can confuse male insects and prevent mating, leading to lower numbers of pests.
Sticky traps are very efficient at catching flying pests, such as whiteflies, thrips, fungus gnats, shore flies, and winged aphids. They can also help to identify hot spots and pest migration patterns. Using these tools can provide a lot of useful information in the field, but they need to be properly set and maintained.
A good way to avoid pest problems is through preventative techniques, such as crop rotation and cultural practices. However, pests may be able to adapt or resist controls, so monitoring is always necessary. The key is to recognize and respond quickly to changes in pest activity, which can be difficult without a good monitoring system.
How to Properly Maintain and Protect Your Replacement Windows
When old windows crack, leak or don’t lock, it can feel unsafe to be at home. Replacing these windows with new, energy-efficient models can help to ensure you and your family’s safety.
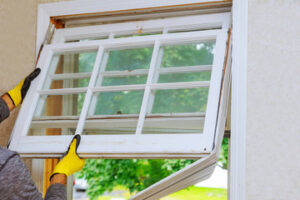
Replacement Windows Sharon are also an investment that can add value to your home. When choosing a contractor, look for companies with excellent customer service.
When homeowners install energy-efficient replacement windows, they can enjoy reduced heating and cooling costs and a more comfortable home environment. These windows are made from double-paned glass and feature low-emissivity (Low-E) coatings that reduce heat transfer, allowing natural light to enter the home while blocking harmful UV rays.
Homeowners who are considering a window replacement project may also want to explore state-level rebates that can help offset installation costs.
Energy-efficient replacement windows can help to eliminate drafts that can make it difficult to maintain a consistent home temperature. They are designed to keep the air in the home at a constant level, eliminating cold spots and reducing energy bills. They also help to prevent the buildup of mold, mildew and rot around the window frame.
Additionally, energy-efficient replacement windows can reduce outside noises, creating a quieter and more peaceful living space. This benefit can be especially helpful for homeowners who live in noisy areas or have young children who need to sleep at night.
Window frame material, glazing and insulation factors are all important considerations when determining the energy efficiency of a replacement window. Window frames can be constructed from wood, vinyl, aluminum or fiberglass, each of which has its own advantages and disadvantages in regards to energy efficiency. High-quality, double-paned windows with Low-E coatings are typically considered the most energy-efficient options.
In addition to improving home comfort, energy-efficient replacement windows can increase a house’s value when it comes time to sell. Potential buyers will be impressed by a home that is efficient, comfortable and safe, and will be willing to pay more for it. For additional benefits, homeowners can add features like between-the-glass blinds and shades to control sunlight and privacy, or upgrade handles and locks for added security. Homeowners can also customize their new windows to fit their personal aesthetic, choosing from a variety of colors, styles and finishes.
Durability
The quality and construction of your replacement windows will determine how well they hold up over time, affecting their lifespan. The main factors that impact durability and average lifespan are frame material and glass type. The frame material will affect how resistant your window is to weather and environmental conditions, as well as how easy it is to clean and maintain. In addition, the glass type influences energy efficiency and how durable they are against shattered glass.
Most replacement windows are made of vinyl, which has become the industry standard due to its low cost and superior weather protection, energy efficiency, and appearance. The best vinyl replacement windows have been engineered to last longer than the average window, offering an optimal balance of value and longevity. The best vinyl replacement windows are also incredibly strong, providing a durable option for homeowners.
Another option for durability is fiberglass. This extremely durable frame material is manufactured through a process called pultrusion, where strands of fiberglass are woven together and then coated in a high-performance resin. Unlike aluminum or wood, fiberglass is not prone to fading, warping, or corrosion, and it will not rust or rot.
Fiberglass windows are also more durable than sash windows. Because they are a stronger and more stable material, they do not expand or contract as much as sash windows during temperature fluctuations, which can cause seal failure. They will not rot or need refinishing like traditional wood or vinyl windows, making them a long-lasting and cost-effective choice for homeowners.
If you are looking for a more energy-efficient option, look for double- or triple-pane windows with an insulated space between the panes to reduce air infiltration. This will significantly improve your home’s comfort and reduce energy costs.
When choosing a replacement window, choose a manufacturer that offers a comprehensive warranty to cover standard wear and tear. This will protect your investment and ensure that you get the most out of your new windows. In addition to standard warranties, some manufacturers offer extended warranties for additional peace of mind. For example, Milgard warranties include lifetime limited warranties on their vinyl replacement windows and a 25-year warranty on their fiberglass windows.
Aesthetics
Windows play a significant role in the way your home looks and feels, both inside and out. They should be both functional and attractive, bringing in light and offering beautiful views. However, old and outdated windows can leave a bad impression on guests and passersby. This is why it is important to consider window replacement for aesthetic purposes.
Modern replacement windows can dramatically improve the overall appearance of your home, while still maintaining a high level of energy efficiency and durability. With a wide range of options and customizations, homeowners can easily find a style that complements their existing architectural design.
Window styles range from picture windows to casement windows, bay and bow windows to sliding windows. These windows can be used to add a focal point to any room or highlight the architectural features of your home. You can also choose from a variety of grilles and muntins to enhance the look of your windows.
You can even add a dramatic flair to your entryway by installing sidelites. These windows, which are used above doorways, can be designed with frosted glass or a stained-glass pattern to reflect your style and create a welcoming impression for visitors. They can be paired with single or double hung windows for an asymmetrical look, or you can choose to use just one sidelite for a balanced look.
The color of your window frames can also make a big difference in the aesthetics of your home. There are a variety of colors available to match your home’s exterior, including vinyl and aluminum. Many homeowners are also choosing to use wood-like materials in their windows for the natural, timeless beauty they offer. Fiberglass windows with a wood grain finish are another option, providing the look of traditional wooden windows with the durability and longevity of fiberglass.
Aside from their aesthetics, replacement windows can help to improve your home’s ambiance and increase its value. Many potential buyers are attracted to homes that feature updated windows, as they offer a more modern look and improved functionality.
Maintenance
Window replacement is a significant investment that will improve your home’s energy efficiency and aesthetics. However, like any other feature in your house, your windows need to be properly maintained and protected to ensure that they last as long as possible.
A few key factors impact the lifespan of your replacement windows, including installation methods, regular inspections, and preventing moisture intrusion. Taking the time to perform these tasks will ensure that your new windows function and look great for years to come.
Choosing the best materials for your windows is crucial to ensuring that they are durable and provide a high level of performance. Many different materials are available, and each has its own advantages. For example, vinyl is a highly durable material that resists corrosion and weathering. It also provides an excellent level of insulation. Additionally, vinyl is very low maintenance, requiring only an occasional washing with water and a mild detergent.
Another important factor is the climate conditions where you live. Exposure to harsh sunlight and extreme temperatures can lead to accelerated deterioration of the window frame and materials. Installing window treatments that block UV rays and utilizing proper waterproofing techniques during installation can help prevent this damage.
If your home is in a historic district, you may need to comply with strict standards when replacing your windows. While you do have some flexibility for windows on secondary elevations, those on primary, street-facing or other highly visible elevations must be historically compatible with the existing windows in their details and materials.
For instance, if your windows are made of wood, you should choose replacement windows that are made from similarly durable materials. You should also avoid using abrasive cleaning products that can damage the surface of your windows and cause premature deterioration. In addition, you should use ventilation fans in kitchens and bathrooms to reduce excess humidity levels, which can cause mold, rot, or damage to framing materials.
How 3D Printing Works
3D printing is a new type of manufacturing that builds parts layer by layer. It is used for rapid prototyping and mass production. Here’s how it works:
To begin with, a virtual design of the object is made. This is usually done using CAD software, a computer program that can create precise drawings and technical illustrations. Contact By3Design now!

Additive manufacturing is a technology that uses a 3D printer to build objects by adding material rather than subtracting it. It is also called digital fabrication and is part of the Industry 4.0 suite of technologies, which includes data analytics, machine learning, AI, cloud computing, and automation.
It is a powerful tool that can reduce production time and improve energy productivity. It can also enable design flexibility and create high-impact jobs. This technology is one of the primary focus areas of the U.S. Department of Energy’s Advanced Manufacturing Office (AMO).
A 3D printing system transforms digital inputs into physical outputs by building layers of material, layer by layer, until the final object is completed. The finished product can be used for a variety of purposes, including prototyping, product design, and industrial applications. Additive manufacturing can create complex shapes and geometries that would be impossible or impractical to make using traditional methods. It can also be used to produce spare parts for existing equipment.
Currently, the most common method of additive manufacturing is fused deposition modeling, also known as FDM. This technique uses a heated nozzle to melt plastic filaments, such as PLA (Polylactic Acid), ABS (Acrylonitrile Butadiene Styrene), and TPU (Thermoplastic Polyurethane). These materials are then applied to a build platform in layers, one at a time. The process is extremely quick and inexpensive, making it an excellent choice for rapid prototyping.
Another important benefit of additive manufacturing is its ability to decrease the number of defects in a final product. This is especially important for medical devices, which are often designed and produced to meet specific patient needs. For example, hearing aids can be made to a person’s exact specifications. This can help improve outcomes and ensure a comfortable fit.
3D printing is a relatively new technology that has been used in many industries, from aerospace to automotive to consumer electronics. The process has revolutionized the way companies produce products and can be a great asset for businesses. However, it is important to understand the risks of this technology, and how to avoid them.
Rapid prototyping
3D printing is a key tool in the product development process, allowing designers and engineers to quickly transform digital designs into physical prototypes. This allows companies to iterate more quickly and accurately, resulting in higher quality products that are more cost-effective. Using 3D printing for prototyping also reduces time to market and increases product reliability, which can help companies maintain a competitive advantage.
During the prototyping phase, designers can experiment with different materials, sizes, shapes, and colors to test how they will affect the fit and function of the product. This can save time and money, as well as reduce risk by avoiding costly mistakes. 3D printers also allow designers to create complex geometries and details that are difficult or impossible to make manually.
In addition, 3D printing can be used to create working prototypes, which are intended to demonstrate and validate the product’s functions. These prototypes are typically made in parallel to the industrial design phase, so that each function can be tested and refined before being integrated into a finished prototype. This helps to ensure that the product works as designed, and it can help to eliminate potential problems during the industrial design phase.
Another benefit of rapid prototyping is that it can help to improve communication between teams, which can increase productivity and speed up the product development process. This technology allows team members to share prototypes with others across the organization and get feedback from users and customers. It also makes it easier to gather data and support for product decisions, which can help to improve the final product.
Traditionally, product designers and engineers would create makeshift proof-of-concept models with basic tools. However, producing functional prototypes and production-quality parts requires expensive tooling and molds, making it impractical to produce them for short-term use or testing purposes. Moreover, these tools are often expensive and take weeks or months to make. 3D printing, on the other hand, can produce high-quality prototypes and end-use parts in a matter of hours. Furthermore, it can reduce costs by eliminating the need for costly tooling and molds, as well as reducing manufacturing overhead.
Mass-production
Production 3D printing is a relatively new industrial process that uses different materials to make products on an industrial scale. It allows manufacturers to produce parts that perform every bit as well as their CNC machined or injection molded counterparts, but at a much lower cost per unit. This allows for faster time to market and reduced capital expenditures.
In addition, production 3D printing allows for quick turnaround times to meet customer demands. This is particularly valuable in fast-moving industries such as automotive, aerospace, and medical. In some cases, manufacturers are completely switching to 3D-printed parts. For example, Canadian manufacturer Precision ADM used more than 100 Form 3B printers to produce Health Canada-approved nasopharyngeal test swabs that they sell to hospitals and doctors across the country.
Although 3D printing has been unable to compete with mass-production techniques like injection molding and CNC milling until recently, companies such as Adidas, Chanel, and Adidas Futurecraft have utilized it to produce a variety of products. This technology is also being incorporated into mass-production by other companies, such as medical device maker Formlabs. In addition to reducing production costs, mass-production 3D printing also offers flexibility in design. It allows for the creation of complex geometries that would be difficult or impossible to fabricate with traditional methods.
For instance, some companies have even used 3D-printed products to manufacture their own fabrics and other materials. This allows them to control the quality of their products and ensure that they comply with safety regulations. Mass-production 3D printing also reduces the amount of labor needed, allowing for greater productivity and efficiency.
As a result, manufacturers can quickly scale up and down their production without the risk of large investments in tooling or machinery. The ability to switch between various production processes can also be beneficial for a business that has a diverse product line, as it enables them to quickly meet customer demand.
The manufacturing industry is constantly changing, so it’s important to find the right production method that will work for your company. With the right printers and materials, you can improve your speed to market and create more innovative products.
Customization
Customization is a powerful tool that allows manufacturers to produce products that are unique to each customer. By enabling customization, companies can reduce production costs and improve their market competitiveness. In addition, customized products can improve user experience and increase customer satisfaction. Customization is also a great way to differentiate products from competitors and create a unique brand identity.
3D printing is a powerful technology for mass customization, as it eliminates the need for tools and molds and enables on-demand manufacturing. As a result, it can shorten lead times and lower production costs. The ability to print parts on demand also helps manufacturers reduce inventory and storage costs, which can save money in the long term.
To successfully implement mass-customization, it’s important to optimize designs for 3D printing. This involves incorporating features such as lattice structures and topology optimization for lightweighting and efficient material usage. These features can help businesses achieve their desired product design without sacrificing performance or quality.
SLA 3D printing can be used to make customizable consumer goods that reflect the needs and preferences of consumers. For example, it can be used to create personalized eyeglasses that fit the wearer’s facial shape and style. It can also be used to make customized medical devices, such as dental implants and prosthetics, which are tailored to each patient’s anatomy.
In addition to improving the functionality of a product, customized 3D prints can add visual appeal and brand recognition. These benefits can help companies improve their market competitiveness, especially in industries where competition is intense. Customization also makes a good marketing strategy for products in high-demand niches, such as sports equipment or automotive components.
Another advantage of 3D printing is that it can create complex geometric shapes that are difficult to machine or cast. This makes it an ideal production technique for manufacturing complex, functional parts. In addition, the process can be used to create a wide variety of materials, including metals and ceramics.
Despite these advantages, there are some challenges with mass-customization using 3D printing. Creating a new part requires extensive planning and design work. In addition, post-processing is required to finish the final product. This may include sanding and smoothing to achieve a specified finish, removing support struts, heat treatment for specific material properties, or final machining.
Types of Life Insurance
Life Insurance Greenville SC provides a lump-sum financial payout, called a death benefit, to your beneficiaries. This payout can be used however your beneficiaries pay for funeral costs, mortgages, and day-to-day expenses.
It is important to review your beneficiaries regularly. Consider changes in family dynamics such as births, adoptions, remarriages, and divorces.

Term life insurance is simple, relatively inexpensive protection that pays a benefit to your beneficiaries when you die during the period covered by the policy.1 Its purpose is to provide your family with enough money to pay off debts, maintain their lifestyle and absorb funeral costs. It’s also often used to supplement retirement planning, as it provides a guaranteed income stream.
Generally, the premiums remain the same during the term of the policy. However, they will increase at the end of the term. For example, a 5-year renewable term policy might start out with a level premium but then increase every five years to a new rate based on your age. Some term policies offer a guaranteed minimum premium, which means your premium will not rise above a certain amount for the duration of the term.
Beneficiaries are typically family members but can be anyone you choose. It’s important to think about who will receive the death benefit when you decide on a term policy.
Often, term policies are sold for a specific length of time, such as 10, 20 or 30 years. This allows you to plan ahead and make sure you have coverage until your children are grown or other obligations like mortgages are paid off. Depending on your situation, you may also want to consider term riders.
These allow you to add additional terms or convert to a permanent policy without the need for a medical exam. Some term policies are automatically renewable, which means the insurer will renew the policy at the end of the term for a specified fee. This may be useful if you want to cover temporary needs such as an education fund or a home loan.
Another type of term policy is called credit life insurance, which covers the outstanding balance on a loan when you die. It’s typically sold by financial institutions, such as banks or finance companies that lend money for cars, furniture and other large purchases on an installment basis.
Whole Life
Whole life is a popular and risk-averse type of permanent life insurance that provides coverage for your entire lifetime. In addition to a guaranteed death benefit, it offers a savings component with cash value that accumulates tax-deferred and may be borrowed against.
With whole life, your premium and the death benefit remain fixed, so you can plan accordingly. In addition, whole life policies can be structured to build dividends that may increase your cash value beyond the amount you pay in premiums. These dividends are based on the company’s experience with investment earnings, favorable mortality and expense savings, or a combination of each. Dividends can be paid in cash, used to reduce future premium payments, or accumulated as interest. They can also be used to purchase paid-up additional insurance.
Unlike term life, whole life policies offer protection that lasts for your entire lifetime as long as you pay your premiums on time. The death benefit is paid to your beneficiaries after you die, and the policy’s cash value is typically tax-deferred until withdrawn.
Because of this, whole life policies can be a great choice for people who are looking to secure their financial needs and provide for the ones they love. Some examples include final expense insurance, which helps cover funeral and other burial costs, and supplemental health care insurance, which can help offset costly medical bills or out-of-pocket expenses.
In fact, whole life is the most popular type of permanent life insurance. According to the American Council of Life Insurers, in 2020, 59% of individual life insurance policies purchased were whole life insurance. This is because it offers a simple and straightforward way to provide a death benefit for your family with guaranteed level premiums, a set mortality rate, and the potential to earn a tax-deferred accumulation of cash value.
Variable Life
A variant on whole life insurance, variable life has an investment component and builds cash values that are subject to market risk. The policyholder chooses how to invest the cash value in separate investment accounts, which are similar to mutual funds. The cash value grows based on the performance of the investments. The company may charge a fee to manage the investments, and the individual assumes all investment risks, which can be high.
This type of policy also offers the option to borrow against the cash values or take partial withdrawals. The money withdrawn is treated as ordinary income and can be taxed. In addition, some policies have a feature that requires you to pay premiums to keep the policy in force. If you don’t, the policy will lapse and no longer provide a death benefit. Many whole life insurance policies offer a no-lapse guarantee, but this is not always available in variable universal life policies.
Some people find the flexibility of a variable life policy attractive, as they can often choose to pay premiums that are higher than their death benefits. However, the higher payments and fees can detract from investment gains. In addition, you will have to undergo full medical underwriting, and you may not qualify for coverage if your health is compromised.
The best way to determine whether a variable life insurance or variable universal life insurance (VUL) policy is right for you is to talk with a financial professional. He or she can help you understand the differences between this policy and other options, including term life insurance and whole life insurance.
When researching policies, examine the internal policy costs and look at historical performance of the investment funds that a particular company holds, Hayes-Blocksom says. You should also consider the guaranteed parts of the policy, which typically include a minimum amount that your beneficiary will receive and a return on your initial investment. In addition, look for a company that charges low premiums and has a good track record of paying out death benefits. Finally, don’t buy a policy based on non-guaranteed projections, Flagg adds.
Universal Life
Universal life insurance offers many of the same features as whole life insurance, but with more flexibility in premium payments. It can also offer the potential for higher cash value growth through a variety of crediting strategies and underlying investment options. UL policies also have the ability to increase death benefit coverage without going through further underwriting (questions about your health).
A UL policy may provide the flexibility of variable life insurance with the security of permanent protection. It allows you to adjust your premium payments based on your needs, which can be beneficial for people who are self-employed or who have income that fluctuates month to month. A UL policy will also provide the option to build up a death benefit that can be paid in a lump sum if you so choose.
There are several types of UL life insurance including guaranteed universal life, variable universal life, and indexed universal life. They vary in their performance and risk, so you should make sure to consult an experienced insurance agent before purchasing any type of UL policy.
Unlike whole life insurance, which has a fixed cost of insurance charge, universal life policies are often more expense sensitive, meaning the insurer deducts a portion of your cash value account to cover its expenses and the cost of your coverage. Because of this, UL policies can have lower death benefit guarantees than whole life insurance.
However, a UL policy typically costs less than whole life insurance, because it provides the flexibility of raising or lowering premiums within certain limits. You will need to watch the cash value account balance over time because withdrawals and policy loans can deplete it, causing your premiums to go up or the policy to lapse.
A UL policy can also be used to buy long-term care coverage, which is a growing concern for people in their retirement years. This is because long-term care costs are on the rise and are often not covered by traditional medical insurance. This rider can help offset these costs by paying a death benefit to the beneficiary of your policy in the event that you need to move into a nursing home or other assisted living facility.
How to Properly Perform Drywall Repair
Drywall Repair Las Vegas is one of those home maintenance tasks that can seem daunting at first glance, but a little patience and elbow grease go a long way. Addressing drywall issues promptly prevents minor problems from escalating to costly and time-consuming repairs.
Small holes such as nail or screw holes, dents, and snags are fairly straightforward to fix with a repair kit and drywall compound. Water damage, on the other hand, requires more in-depth repair work.
Drywall cracks are a common home problem. Some are harmless, while others indicate serious structural issues that must be addressed immediately.
Small cracks in drywall can usually be repaired with a spackle or drywall compound. A drywall patch kit can be used for larger holes. When a wall is being repainted, any cracks should be filled and smoothed before the next coat of paint. Cracks in drywall are also signs of other problems, like mold or water damage, which must be addressed before painting over them.
One of the most common causes of drywall cracking is settling or movement in the structure. If your building is new, this is normal and should be expected for a few years while the foundation shifts and settles. It is important to hire a professional for drywall repair as soon as you notice these cracks, as they will likely recur unless the underlying issues are corrected.
Other common causes of drywall cracks include temperature changes, aging materials, and structural overload. For example, if you hang heavy items on your walls, they can cause the drywall to crack. It is important to anchor the items to studs and use brackets where necessary.
Also, aging drywall can be susceptible to moisture which leads to swelling and separating from the wall. In this case, a new sheet of drywall should be installed as quickly as possible to prevent further damage.
If a crack appears in your drywall that is straight and thin, it may be caused by faulty or poorly installed drywall tape. It is important to replace any drywall tape with new strips after the crack has been repaired.
If your drywall is cracking in areas that are not near doors or windows, it could be a sign of a structural issue with the foundation of the house. These problems can get worse over time if ignored, and may require more extensive and costly repairs in the future. A building inspector can help determine the underlying cause and resolve it before it becomes more problematic. This will minimize future costs and damage to the home or building.
Holes
Small holes from nails and screws can be patched with drywall spackle or joint compound. Using a putty knife, apply the compound in a crisscross pattern. When dry, lightly sand and apply another coat. It may take several coats to fully cover the hole. Once the patch is smooth and even with the rest of the wall, feather the edges to blend them. This will make your repair look professional rather than a patch.
Larger holes require a different approach. Use a stud finder to locate and mark the studs on either side of the hole. This will help you avoid nicking electrical wires or plumbing as you work. Cut a replacement piece of drywall to the same size as the hole and secure it with furring strips and drywall screws. Apply joint tape and mud, or “feather” the seams, just as you would when installing new drywall.
Before you do anything to the drywall, be sure to clean the area and remove any loose debris. Leaving drywall dust on the surface will cause your patch to adhere poorly and it will not look neat and even under a coat of paint.
Whether you’re repairing a nail pop or larger hole, it’s important to start with a clean surface. Be sure to sand the area to smooth any rough spots and wipe away any dust with a damp cloth. Then clean the hole with a mild solvent to remove any dirt or grease that might prevent your compound from adhering well.
A good place to start is with a repair kit that includes both a patch and a bag of joint compound. Most kits can be purchased at your local hardware store. Alternatively, you can use a sheet of drywall and joint tape to create the same effect. Just be sure to follow the instructions carefully and carefully avoid nicking any wiring or plumbing. If you do, you may need to re-cut the piece of drywall. You should also be careful not to cut through the underlying framing of the house or it may collapse.
Nail Pops
There’s nothing quite like a smooth coat of paint, but sometimes drywall issues can pop up that interrupt that perfect plane. One such issue is known as a nail pop, or protrusions that appear on the wall when nails used to secure drywall pull away from their original positions. These can occur due to various reasons, from changes in humidity and temperature to the wood framing of your home shifting over time.
Nail pops can be a bit of a nuisance to deal with as they spoil the overall appearance of a room and may catch on clothing or other objects if not fixed. They can also be a sign of larger structural problems with your house, such as doors that stick or cracks around windows and doors. If you notice a lot of nail pops throughout your home, it’s worth investigating whether these could be signs of a foundation issue that requires further investigation by a professional in Vaughan.
The most common reason for nail pops is a change in humidity and temperature, which can cause the lumber used to build your home to expand slightly. This expansion can put pressure on the nails holding the drywall, causing them to move and loosen the joint compound covering them. Once the joint compound becomes exposed, it can easily come off and reveal a nail head.
When a nail pop appears, you can easily fix it by driving the nail back into its original position. To do this, first locate the nail by looking for a small dimple on the surface of your wall. Stand on a step ladder or stool and press gently into the dimple to see if it moves. If it does, use a drywall screw to drive the nail in again, but only to a point that is recessed slightly beneath the surface.
Once the nail or screw is re-set, apply a thin layer of spackling over the spot and let it dry. Then sand the patched area lightly to remove any excess spackling and make it smooth again.
After sanding, it’s important to prime the entire surface of your wall before applying a new coat of paint. This will help ensure that the spackled spot matches the rest of your wall in both texture and color.
Water Damage
Drywall is a porous material that absorbs and holds moisture, making it susceptible to mold, mildew or crumbling if not treated properly. If your home suffers from a flood, hurricane, burst pipes or other water-related event, the affected drywall should be replaced. It’s important to be able to identify the source of the water and eliminate it before beginning repairs.
Discolored water stains on walls are typically the first sign of damage. Other warning signs include a musty smell, wallpaper bubbling or paint that is soft to the touch. The underlying drywall should also be carefully examined; if the material is sagging or buckling, it will need to be completely removed and replaced.
Once you’ve identified the area of drywall that needs repair, it is essential to clean the walls and ceiling thoroughly. Remove any sagging or buckled sections and dry the remaining drywall with fans, dehumidifiers, and open windows to help speed up the process. It’s also a good idea to wear gloves and masks when working with any raw materials, as mold spores can easily be released during the repair process.
After the drywall has been cleaned and dried, it’s time to prep the surface for repair. Begin by putting down drop cloths or tarps to catch any drywall pieces, dust and debris that may fall during the process. Then, using a power drill, remove the drywall screws that held the old sheet to the wall studs. Depending on the severity of the damage, you may need to remove the entire section of the wall and replace it.
If the water damage is severe, the drywall should be completely removed down to the studs and then sanded down, allowing for a smooth surface that will be ready for new drywall to be installed. Once the drywall is dry, it’s essential to use a primer to protect the newly repaired areas from future moisture and mold.
As a general rule, any time physical damage occurs to your home’s walls or ceilings, drywall repair will be necessary. Whether the damage is from a small hole, mold or water damage, it’s crucial to have a drywall company that you can trust to perform quick and effective repairs.
Why Garage Door Repair Is Necessary
Garage Door Repair Blanchard can be a time-consuming process. Whether it’s an old single-panel door or a complex sectional system, the type of repair and the expertise of the professional will affect how long it takes.
Minor damage, like a dented panel, is easily repaired, but a misaligned track can take longer. Lubricating regularly keeps the moving parts working smoothly.

A broken cable can be the result of many different issues. It can be caused by a cable that needs to be properly secured or simply a cable that has stretched or frayed. A broken cable is a safety hazard for anyone in the garage as it could suddenly cause the door to fall. It can also create an imbalance that strains components like rollers and hinges.
Cables are under constant stress as they move up and down the garage door each time it is operated. They travel over pulleys and wind on a spool or cable drum. Over time, this part can wear out due to constant use or deteriorate from moisture near the bottom of the door. A professional can identify problems such as a worn-out pulley or spool, excess moisture, or improper tension and adjust or replace them as needed.
The cables are made of heavy-duty twisted wires that are galvanized to resist corrosion. However, over time, salt water exposure can corrode the metal and weaken the cables to the point where they break.
Performing a visual inspection of the cables on a regular basis will allow you to spot potential problems and replace them before they snap. You should look for signs of fraying, rust or excessive wear. It is recommended to lubricate the cables as well to reduce friction and extend their lifespan.
Depending on the style of your garage door, there will be either one or two cables per side. The first step in replacing the cable is to open your garage door as far as it will go and set a ladder under the track near the last roller. Repeat the ladder and locking pliers or C-clamps procedure on both sides of the door to prevent it from closing unexpectedly. Locate the old cable and note which way it was traveling in the pulley. This will help you to align the new cable correctly.
Damaged Panel
There are various ways that your garage door can become damaged, including general wear and tear, water or mold damage, and impact-related damage from vehicles or sports equipment. Depending on the type of damage, it may be necessary to have the panel repaired or replaced. While some homeowners may try to do DIY repairs, this isn’t always the best option. The complexity of the process, the specialized tools needed, and the weight of your garage door make it an area where it’s often better to leave the task to professional repair technicians.
The location of the damaged panel plays a big role in whether it’s something that requires repair or replacement. A small dent or scratch isn’t likely to affect the functionality of your garage door, but damage near a hinge can significantly impact how the door operates. It’s also important to assess how much damage there is overall, as the more widespread it is, the less likely it will be that replacing a single panel will address the issue.
In some cases, a faulty spring or other mechanical failure could be the root cause of a specific damaged panel. This means that the problem is more extensive than just that one panel and needs to be addressed along with any other repairs required. It’s important to work with a company that offers comprehensive services to ensure that any additional issues are addressed and resolved, as well as to provide preventive maintenance to extend the life of your garage door and avoid future problems.
Replacing a garage door panel can be complicated, especially if it’s an older model that was manufactured before the industry standardization of components. If you’re able to find a replacement that matches the existing style, it can be a simple and cost-effective solution to your problem. However, if you’re not able to find a matching panel or if the other panels are in worse condition, it might be more practical to consider an entire replacement. The good news is that if you take the time to perform regular inspections, preventative maintenance like lubrication, and install protective measures, your garage door should last a long time before it will require a replacement or need full repair.
Weather Stripping
Weather stripping fits between your door and the frame or threshold of your home to prevent air and light from leaking through. It can be made from a wide variety of materials including felt, foam tape, vinyl or metal. It’s a good idea to inspect it regularly to ensure that it is still intact and functioning properly.
It can also be helpful to keep a few types of weather stripping on hand for quick repairs and replacements. Felt is one of the most common and inexpensive options that can be found at many home centers, lumber yards and hardware stores. It is easy to use by cutting to length with scissors, peeling off the adhesive backing, and pressing firmly against the door stop. It typically lasts a year or two before it needs to be replaced.
Foam tape is similar to felt but offers more durability. It is usually a thicker material than felt and has a more advanced adhesive that makes it easier to install. It’s not as vulnerable to moisture as felt but is still less durable than rubber. It’s available in a range of widths and thicknesses to accommodate most garage doors.
Another popular option is compression weather stripping, which is a thin piece of rigid foam that mounts into a slot on the door stop. This type of weatherstripping is more durable than felt and can be adjusted to fit a wider range of door sizes.
If you’re worried that your weather stripping is no longer providing a barrier to the elements, try this simple test: wet your hand and place it against the surface of the door or window. If it feels cool, that indicates that a draft is coming through the gap, and it’s time to invest in some new weather stripping.
Another effective way to seal the gaps around your doors is to add a bottom door sweep. These are often composed of a metal strip that screws onto the bottom of the door (the header) and a nylon brush or piece of nylon that extends to the floor (the sweep). It’s simple to install but can be more effective than just using a single foam strip.
Broken Spring
The springs of your garage door are a vital component in opening and shutting the door. They store and release energy by twisting in tightly wound coils. When they reach their breaking point, they can snap with a loud bang. If your spring is broken, it’s time to call a professional for repair.
One of the first signs of a broken spring is an inability to open the door. A torsion spring stores energy in a series of coils, so when the spring breaks, there isn’t enough tension to lift the door. Instead, the door will likely open or close slowly or with a jerky motion.
Another sign is a visible gap between the coils of your torsion spring. If you notice a gap, the spring has already reached its breaking point and no longer holds enough energy to work properly. It’s important to replace both springs if one is broken, as the other will not be far behind.
Garage door springs are dangerous and require professional replacement if they break. In fact, people have been maimed or even killed when they try to replace their own garage door springs without proper training and knowledge.
To remove a broken torsion spring, you’ll need to disconnect the power and clamp the door to prevent it from moving. Then, you’ll need to release the tension on the cable drum. Once the cable is free, you’ll need to disconnect the motor. You can then unwind the remaining springs using a steel bar. When you’re done, you should have a new spring with the right size and length. To make sure your new spring is the same size as the old one, measure it when it’s completely relaxed to find its length and inside diameter.
A Birth Injury Lawyer Can Help You Build a Strong Case
You may be eligible for compensation when a medical mistake during the birthing process leads to an injury. Alabama Birth Injury Lawyer will fight to get you the money to pay for a lifetime of care.
They will assess the long-term costs of a birth injury based on assessments from life care planners. They will then negotiate a fair settlement or fight for your case in court.

The birth of a child should be one of the most joyous moments in a family’s life. But even a minor medical mistake can turn childbirth into a nightmare. If your child suffers from a birth injury that permanently alters their physical or cognitive abilities, a lawsuit may be necessary to obtain the resources needed for their care. Our birth injury lawyers understand the complex process of filing a malpractice claim and can help you build a strong case.
A successful claim must demonstrate four critical elements: duty of care, breach of duty, causation, and damages. Your lawyer will analyze the evidence and expert testimony to show how the at-fault healthcare provider failed to meet their professional obligations, resulting in your child’s injuries.
Most states require medical professionals to uphold a certain standard of care for patients. When a doctor deviates from this standard, causing an injury, they have committed malpractice. For example, a doctor might breach their duty by neglecting to monitor fetal heart rate or improperly using birthing tools. Your lawyer will prove that the at-fault healthcare provider’s failure to uphold their standard of care caused your child’s injuries by presenting medical records, expert witness testimony, and other relevant evidence.
Your attorney will also prove that your child’s injuries have impacted their quality of life and your family’s finances. This includes identifying their current and projected medical costs, future loss of income, and pain and suffering. Your lawyer can help you gather the necessary documentation to calculate these damages and ensure that your settlement adequately reflects them.
Severe birth injuries often impose expensive medical treatments and ongoing care expenses. In many cases, families can’t afford to pay these costs on their own. Your lawyer can negotiate an adequate settlement amount or file a malpractice lawsuit to put pressure on insurers and force them to make a fair offer. Your attorney can also protect you against attempts by insurance companies to delay your case or trick you into accepting a low settlement.
Gathering Evidence
A medical malpractice claim related to a birth injury requires strong evidence of substandard care. Usually, this is achieved through medical records and expert testimony from specialists who can attest to the nature and extent of your child’s injuries. Your attorney will also gather and review policies and procedures allegedly violated, as well as other evidence including witness statements.
First, your attorney must establish that there was a doctor-patient relationship and that the medical professional owed you and your baby a duty of care. Your lawyer can easily do this by obtaining your hospital bills, medical records, and any other relevant information.
Once this has been established, your lawyer must prove that the medical professional breached his or her duty of care. This is done by comparing the medical professional’s actions and/or inaction with the standard of care, which would have been followed under similar circumstances. Your lawyer will call on expert witnesses to explain the applicable standard of care and demonstrate how your family’s injury occurred as a result of the defendant’s negligence.
Finally, your lawyer must prove that your baby’s injuries caused damages. This can be a difficult task as it requires showing that your child’s condition has impacted you and your family in numerous ways. Examples of damages include medical expenses for treatment, equipment and home modifications, lost income if your child can’t work, pain and suffering, loss of enjoyment of life, and more.
Many families have to empty their savings and retirement accounts to pay for the ongoing treatment of their children’s birth injuries. A jury award or settlement could allow your family to live without the financial stress. Your birth injury lawyer can help you determine your total damages and negotiate with insurers to get the maximum settlement possible for your case. This money can cover your child’s lifelong medical care, rehabilitation, therapies and assistive devices as well as other costs resulting from the injury, such as lost income. The legal team at Wilson Law Firm can help you file a claim and obtain the compensation that you deserve.
Negotiating with Insurers
Injuries caused by medical negligence can be costly. They often result in long-term treatment, requiring surgery, medication, and different types of therapy. These expenses can add up and may leave parents struggling to make ends meet. Fortunately, the law allows victims to file claims against the responsible healthcare professionals and demand compensation for their losses. However, building a strong case and fighting for maximum compensation can be complex. A skilled New York Birth Injury Lawyer can help guide families through the process and protect their rights.
After conducting a thorough investigation, the legal team will work with you to file a birth injury lawsuit against the doctor or hospital responsible for your child’s injuries. They will gather detailed evidence, including medical records and expert testimony, to prove malpractice and build a case for maximum compensation. In many cases, a medical malpractice lawsuit will result in a settlement. If not, your lawyers will fight in court to obtain the maximum verdict possible for your family’s losses.
Insurance companies recognize that you and your family are facing mounting expenses related to your child’s birth injury. They know that you’re desperate to get your claim settled so that you can pay your bills and provide for your child’s future. They may use this knowledge to pressure you into accepting a lower settlement than your case is worth. A New York Birth Injury Attorney can evaluate your case and ensure that any settlement you accept reflects the full extent of your damages.
The legal team at our firm has recovered millions of dollars for families dealing with the consequences of serious birth injuries. We have secured multi-million dollar settlements with malpractice insurers and won countless cases in trial. To learn more about how we can help your family, please contact us now to schedule a free case review. We represent families on a contingency basis, so you don’t pay anything out of pocket unless we win your case. Our firm has national reach and local offices to help families across the country. We’re also familiar with the statutes of limitations for each state, which helps us ensure that your case is filed in a timely manner.
Litigating in Court
One of the goals of a birth injury lawsuit is to secure financial compensation for medical expenses related to a child’s permanent or life-threatening condition. This compensation may also be intended to cover other damages, such as the costs of a lifetime of care, special education expenses, therapy and treatment costs, equipment and home modifications, lost income, pain and suffering, and compensation for a generally diminished quality of life.
Depending on the nature of a child’s injury, a lawyer may need to call on medical experts to review the case and explain what the defendant’s duty of care was, and how their actions or inaction fell short of that standard. These experts often have expertise in specific areas of medicine and are called upon to provide testimony during the trial or settlement negotiations.
When a doctor or other medical professional is held responsible for a child’s injuries, it is usually because they violated their duty of care to the mother and/or child. A breach of this duty typically occurs when the health care provider fails to act or react appropriately to a problem that arises during the labor and delivery process. This can include failing to perform a timely C-section, or pulling too hard on a baby’s head or neck during a delivery.
Medical negligence claims are complicated and require detailed legal analysis. A good birth injury attorney is well-versed in the nuances of medical malpractice law and will have access to an extensive network of medical professionals who can assist with analyzing a claim. A skilled lawyer can also help with a notice of claim, which must be filed within the applicable statute of limitations to preserve the right to file a lawsuit.
A birth injury lawsuit can be difficult for families, especially if they are seeking compensation from their child’s obstetrician or hospital. While a lawyer can help to ease the stress of these situations by filing a claim, it is important for parents to carefully choose an attorney who has experience in this type of case and will be able to negotiate a fair settlement with the insurers.
Stucco Repair Guide For Cracks Holes And Water Damage
Stucco can be damaged by rain, storms, and other environmental conditions. Proper maintenance and preventative measures can help keep your stucco looking great.
Inspect your stucco regularly for cracks, holes, and discoloration. If you notice water damage, Stucco Philadelphia pros should be consulted to address the source of the problem.

Prep the Area
Detecting stucco damage at the first signs of trouble can help you save money, avoid structural damage, and preserve your home’s value. Cracks and holes are the most obvious indicators that it’s time to get to work, but other warning signs of a problem include damp spots on your wall, discoloration, or a musty smell indoors. Water leaks can lead to serious problems, so it’s essential to act quickly when you see any signs of trouble.
Before you start any major repairs, make sure you have the right tools for the job. A moisture meter and a thermal imaging camera can give you the details you need about the state of your stucco. You’ll also need a variety of hand tools, including a pry bar and hammer for removing loose stucco, a trowel, a caulk gun, and a stucco mix. It’s also a good idea to have some personal protective equipment, like safety goggles and gloves.
If your stucco has suffered major damage, it’s best to hire a professional who does this type of work regularly. Major repairs are complex and can involve removing the existing stucco, wire lath work, wood framing, and sheeting. This may require a scaffolding system and specialized skills.
For smaller cracks, you can simply wire-brush and wet the brown coat, and trowel in a new finish. For deeper cracks, you’ll need to undercut the damaged area with a cold chisel. This will widen the bottom of the crack to help it “key in” to the new stucco and prevent moisture from leaking behind the finish.
Next, prepare the repair area by washing it to remove any dirt or debris. Then, you’ll want to protect the exposed lath with the builder’s paper. Cut a piece of paper to fit the exposed area and secure it with construction staples or adhesive. Make sure it overlaps the areas that are already covered by other layers of building paper, and let it dry according to the manufacturer’s instructions. When the builder’s paper is in place, you can proceed with your repair.
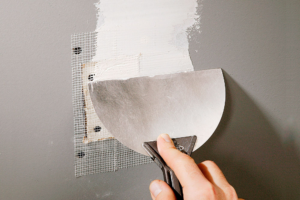
Fill the Crack or Hole
Cracks and holes in stucco are often the result of water damage and are an indication that the structure is deteriorating. It is important to address these problems as soon as possible, so they don’t worsen over time. The first step is to clean the area around the damaged section. This will help ensure that the patching materials adhere well and that the repaired section of the wall will blend seamlessly with the rest of the stucco. Using a wire brush, clean the surface of any dirt or debris that is stuck in the cracks or holes. Then use a spray bottle to wet the area surrounding the cracked portion. This will serve multiple purposes; it helps the patching material set better, and it also hydrates the cracked stucco so that it is less likely to continue to deteriorate and crack.
For small cracks, or hairline cracks, that are no wider than a dime it is possible to simply fill them with a latex caulking compound. Make sure that the caulking compound is meant for stucco, and follow the instructions on the label. Once the caulk is dry, apply a coat of acrylic latex paint that matches the rest of the stucco.
Larger cracks or holes that go all the way through the stucco, however, will require more extensive repair. This is because the structure is more prone to water damage, and it is more difficult to seal and waterproof the entire structure when a hole goes all the way through it. Regardless of the size of the hole, it is best to start with an all-purpose stucco patching compound that is mixed according to the manufacturer’s directions. Once the patch is applied, it should be allowed to set up before applying a layer of fiberglass mesh.
Once the mesh is in place, it is time to finish the repair. This can be done by either using a stucco patching compound that is pre-mixed and ready to trowel on, or a conventional stucco mix that needs to be prepared in a plastic bucket or tray following the manufacturer’s instructions.
Apply a Coat of Patching Compound
Using a putty knife, apply a thin coat of patching compound to the crack. Make sure that it is tightly packed into the crack and that it is almost flush with the existing stucco surface. This will help to ensure that rainwater cannot get behind the crack, where it could cause damage and moisture problems. Allow the compound to dry as directed on the product label.
For small cracks that are not separating the sheathing or studs, a paintable high-quality caulking material can be used instead of a stucco patching compound. The caulking material should be sanded to provide a smooth, consistent surface and to match the texture of the surrounding stucco.
If you have larger cracks (about 14 inches wide or wider) or holes, you will need to use a different type of repair material and a more extensive prep process. For these larger cracks and holes, a professional stucco contractor should be called in to troubleshoot and repair the problem.
The first step is to clean the area thoroughly and remove any loose debris or dirt. This will prepare the surface for proper bonding and will prevent water from seeping into and damaging the underlying wood lath supports. The studs or sheathing should also be checked for any signs of water damage. If they have been exposed to water over time, the studs will likely need to be replaced.
Next, the area should be primed. Several products can be used for this purpose, but a good choice is damp concretepPrimer. This can be applied to bare stucco, masonry, or concrete surfaces. It will soak into the large, medium, and small pores in the bare stucco or concrete and help to seal the crack.
Once the primer has been allowed to cure, you can then begin applying the actual stucco patching compound. This can be purchased in a pre-mixed form that is ready to trowel on or in a conventional stucco patch mix that needs to be mixed in a wheelbarrow or plastic tray following the manufacturer’s instructions. For the hole, be sure to apply the patching compound evenly so that it is flush with the existing surface. Once the patching has been allowed to dry, it can be sanded and painted to match the existing stucco.
Paint the Patch
Adding a layer of protection and camouflage to your stucco repair project will help it last longer. Paint will also add extra strength to the repaired surface by covering up imperfections and allowing the patching material to bond with it better.
Before beginning a stucco repair job, it’s important to properly inspect the damaged area and determine the type of damage you are facing. Visual inspections can reveal cracks and holes, but a physical test may be required to check the extent of the damage. A light tap of the stucco surface with a rubber mallet can indicate whether it has separated from its lath support, which indicates deeper damage. A moisture meter can also be used to gauge the amount of water trapped within the walls.
Cracks and holes are not just unsightly—they can be paths for water to seep in and cause more serious issues, like mold growth and structural damage. The most common signs of water damage in stucco include dark spots and discoloration, loose or bulging stucco, and cracks that widen over time. A spongy feel to the stucco, which is caused by trapped moisture, is another indication of moisture damage.
If you decide to tackle a hole or crack yourself, begin by cleaning the area with a wire brush and cleaning it with water using a sponge or a garden hose. This will remove any dirt or debris from the damaged area, ensuring that the patching material will adhere to the existing stucco. If you’re repairing a large hole, use a piece of plywood or other wood cut to fit the size of the hole to create a backing for your repair. Once you’ve cleaned the damaged area, wet it with a sponge or garden hose and then wet the surface of the patching compound, following the manufacturer’s instructions.
Once the patching compound has dried, cover it with plastic and secure it with painter’s tape to prevent accidental splatters. This will also allow the stucco to dry and cure without being exposed to the elements. Once the patch has dried, apply a thin coat of primer to the patched area with a bristle or foam roller and let it dry for two hours or according to the product’s label.
Integrated Pest Management – Combining Techniques For Better Results
Integrated pest management is a system of preventative evaluations, decisions, and controls. Prevention starts with a careful identification of each pest and includes monitoring to estimate whether damage is unacceptable.
When preventative methods fail, IPM options range from physical removal or trapping to stronger chemical treatments. Monitoring provides information about each pest population such as their life cycle, damage potential, and natural enemies. Click here at https://armispestmanagement.com/ to learn more.

Steaming and Heating
Integrated pest management (IPM) is a systematic decision-making process that uses biological, cultural, physical, and chemical tools to identify and control pests in agricultural and natural resource settings. Its goal is to minimize economic, human health, and environmental risks.
IPM programs begin with prevention practices. These include sanitation, structural repairs, proper food storage and disposal, pest-proof traps, and other techniques that change the environment in which a pest lives. These methods deny the pest the food, water, or shelter it needs to survive and reproduce. They also deprive weeds of the sunlight they need to grow and prevent disease organisms from infecting leaves.
When pest populations are above action levels, the IPM team will decide on the right combination of pest control tactics. If chemicals are needed, the least toxic materials are chosen to minimize exposure to humans and non-target species. The decision to use chemicals should be based on accurate monitoring data and an evaluation system that includes the results of all inspections, trapping, and treatments.
Steaming and heating are two of the many non-chemical methods that can be used to reduce weed growth or control pathogens. They can be combined with other non-chemical methods, or used on their own to replace the need for conventional spraying or mowing. For example, steaming and mulching together can eliminate weeds without the need for herbicides. Steaming also sterilizes the soil, preventing diseases that can infect crops. It can be done in fields, greenhouses, and even indoor facilities. The technique can be applied using a regular commercial steam machine or a homemade device.
Soil Solarization
Soil solarization involves covering the soil surface with a transparent polyethylene film during the summer to trap and heat the sun’s rays. The high temperatures created by this process kill pathogens, fungi, insects, nematodes, and weed seeds. It can also reduce the amount of hand weeding needed in the garden or lawn.
While the thermal killing of pests is the main benefit of this technique, its effectiveness is attributed to a variety of biological, chemical, and physical processes that occur during and after treatment. For example, it is known to shift beneficial soil microbe populations and enhance the ability of plants to absorb nutrients.
In addition to reducing weeds and plant diseases, solarization improves soil quality by speeding up the breakdown of organic material. This releases nutrients like nitrogen, potassium, calcium, magnesium, and fulvic acid which are important for plant growth.
Although solarization is a viable option for many annual weeds, it is less effective on perennial weeds like purple and yellow nutsedge and field bindweed growing from rhizomes. It is also not very effective in areas with shallow soils and sandy or light clay soils that don’t hold water well.
Regardless of the soil type, however, the area to be solarized must be prepared carefully. Prior to treatment, the surface should be free of clods and other debris that can block sunlight from reaching the soil below. A rotary hoe or rototiller can be used to break up clumps of soil and loosen the surface for better coverage with the plastic. Once the plastic is in place, it should be kept in place until daily maximum temperatures of 110o to 125oF are reached, as measured by a soil thermometer or temperature probe.
Intercropping
The goal of intercropping is to use crop groups or species with complementary growth habits, nutrient requirements, and resistance to pests. In addition, mixing different types of plants in the field also promotes agrobiodiversity and can help curb plant diseases and pathogens.
Traditionally, pest management focused on using chemicals to kill or repel unwanted organisms. This was the mainstay of traditional agriculture, but it is now considered to be unsustainable in a world where environmental concerns are paramount. Chemicals harm people and natural habitats, cause disease in plants, and lead to the development of resistant organisms. Integrated pest management is a more effective approach that focuses on controlling unacceptable levels of pest damage and uses minimal chemicals.
One of the first steps in integrated pest management is to monitor pests. Identifying them accurately gives you the information you need to determine an action threshold and to use less aggressive control methods. It also makes sure that your pesticides are used properly to minimize risk to people and the environment.
Intercropping is an effective way to protect your cash crop against pests. It provides a physical barrier, depriving pests of their food sources, shelter, and water. It can even deter them by encouraging predatory organisms to eat the pests in the area. It can also help with erosion by holding the soil together.
For example, legumes grow well with most cereal crops and can prevent nematodes that destroy roots in the ground. Similarly, leafy vegetables can be planted with tomatoes to prevent fungal infections that can ruin the crop. Intercropping can also be used to control pests in the air. Planting a crop that matures at a different time than the main crop allows you to harvest it before the pests are done breeding.
No-Till Practices
The goal of no-till practices in integrated pest management is to use natural enemies and favorable weather conditions to control plant diseases and insect infestations. The cultivation technique reduces soil erosion, promotes soil aggregation, and improves crop health. The practice utilizes cover crops to enhance pest control.
Soil is a complex system of living and non-living elements that includes microbial biomass of fungi, bacteria, and fine roots that aggregate and store nutrients for plants. Conventional tillage breaks up these aggregates, reducing the amount of microbial biomass that protects from predatory insects and other harmful organisms.
A key component of IPM is identifying the level of pest damage homeowners can tolerate, which requires monitoring regularly and accurately determining the population levels of target pests. This information is used to decide whether a pest problem exists, or if the population is increasing to unacceptable levels.
Mechanical IPM options include removing or picking out pests by hand, burning, or using traps that attract and collect through air suction, electrical attraction, or sound. Many of these methods are also used in organic farming and gardening, as they are environmentally safe and economically feasible.
The simplest preventative IPM option is choosing disease-resistant or tolerant cultivars, which can greatly reduce the need for pesticides in the future. The agronomist who oversees the operation credits his no-till field rotations and moth-trapping monitoring with his ability to keep corn earworm losses to an acceptable minimum.
Preventative measures such as establishing a healthy seedbed, selecting certified seeds and visual inspection of planting materials can dramatically reduce the need for chemical pesticides. Organic farmers often use compost and manures to increase the microbial activity in their fields, which enhances the health of their soils. The use of cover crops, if done correctly, can prevent pest problems before they occur. In some cases, barriers such as fences or screens are necessary to protect the crop from invasive wildlife that might otherwise interfere with pest control measures.
Monitoring
In the field of integrated pest management, monitoring is essential to evaluate whether a control technique is working. Monitoring is done by observing the number of insects present or measuring the damage caused by the pests. This helps to determine the extent to which the pest population can be tolerated and at what level specific intervention is needed.
Monitoring a crop, garden or landscape also allows you to determine which techniques to use. By combining various prevention and control strategies, you can reduce the need to apply pesticides, which may pose health risks to people or harmful effects on other plants and wildlife.
For example, by reducing the amount of sunlight that weeds receive, mulching around plants, or mowing more often, you can deny weed seeds the light they need to germinate. By avoiding watering, you can deprive fungal pathogens of the moisture they need to infect leaves and cause disease.
By identifying pests, you can decide whether to employ biological control agents (predators and parasitoids) or cultural methods to suppress them. Biological control agents mimic the natural predator-prey dynamics of ecosystems and are an important component in integrated pest management. If introduced into a new environment, however, a biological agent may become a pest itself unless it is controlled.
Integrated pest management is the practical manipulation of plant pests using sound ecological principles to keep pest populations below a level causing economic injury. IPM is based on monitoring and the evaluation of control measures to achieve a balance between environmental and economic factors. It was developed in response to the steadily increasing use of pesticides, resulting in repeated pest control crises and the evolution of resistance to chemical agents. The law requires federal agencies to use IPM.
How to Get the Most Out of Link Building and Backlink Monitoring
Backlinks are one of the primary ranking factors for search engines. Getting quality backlinks requires a strategy that includes creating relevant content and building relationships with other websites.

Ideally, the backlinks should come from sites that are related to your industry. It is also important to note that the number of backlinks can be a factor in SEO rankings, but it should not be your only goal. For professional help, contact Outdoor Advertising Houston.
Link building is the process of getting other websites to include links to your website on their pages. This is an important aspect of SEO, as it tells search engines that your site is relevant to the topic. It also helps build trust in your site. Link building is a long-term strategy, and it can take time to see results. However, if you’re patient, you can build a robust backlink portfolio and increase your ranking on Google.
A quality backlink is one that comes from a domain that is related to your website’s topic or niche. It’s important to avoid spammy or irrelevant links, which can harm your rankings. It’s also a good idea to have a variety of types of links, including text, image, and video.
You should also avoid manipulative link building tactics, which are considered black-hat techniques and can lead to a penalty from the search engine. Some of these methods include purchasing or trading links, posting to forums and communities, or guest blogging. However, you can still use these tactics, but they should be a small part of your overall strategy.
It’s also a good idea to make sure that the backlinks you’re getting are from relevant pages. For example, if you’re in the pet industry, a link from a dog blog is more valuable than a link from a car blog. This is because the link will be more relevant to your audience and will be more likely to be clicked on.
Another great way to find potential links is to use a tool like Semrush to analyze competitors’ sites. You can add keywords and competitors to the tool, then view the prospects by clicking “View Prospects.” This screen will show you everyone who is willing to link to your website. You can also reject prospects from this page if they’re not relevant or don’t want to link to you.
Email outreach is the process of reaching out to other websites to persuade them to link to your content. This is a great way to generate high-quality links, but it’s important to know how to do it properly. First, you need to identify your target audience. Once you’ve done this, it’s time to start looking for opportunities. The key to success is having a subject line that stands out in a sea of emails. You should use a subject line that is clear and concise. It should be friendly and warm, and it shouldn’t be overly salesy.
Keyword research
Keyword research is a key practice that helps marketers and business owners connect with their audience. It is the foundation of any content strategy and identifies keywords that search engines use to answer a query. It also reveals the intent of a user, which is an important factor in SEO. In addition, it helps business owners and marketing professionals decide which keywords to include in their content to ensure that their website shows up on search engine results pages.
Using keyword research, you can identify the best keywords to target for backlinking. The best keywords are those with low competition, meaning that you have a good chance of ranking them. However, you should avoid using keywords that are too broad, as they will have low search volume and may not drive qualified traffic to your website. Instead, you can use long-tail keywords, which are more specific and have a higher conversion rate.
You can find keyword research tools that allow you to look at the most popular searches per month for your niche. These tools will also show you the number of competing websites that are targeting those keywords. You can then use these insights to create unique content that will attract your audience and improve your ranking on search engines.
Another way to build backlinks is to participate in industry events and conferences. These can be great places to meet potential clients, vendors, and partners. You can even exchange social media promotion with a brand that has similar interests, and this is a great way to increase your reach. You can also use a domain mention tool to identify usages of your brand name in external articles. For example, if you win an award or are named in a press release, you can contact the source and ask them to link to your website.
To do keyword research, you can use a free tool such as Google Keyword Planner. It will give you a list of related search terms, along with their volume, intent, and topic. You can also filter these terms based on the number of competitors and keyword difficulty.
Content creation
Content creation is a vital part of any online marketing strategy. It involves writing, video production, and other media that provide value to your audience and enhance engagement. It also involves planning, research and analysis to ensure your content is effective and targeted. The goal is to connect with your audience by providing them with information they want and need. Ultimately, it’s about delivering quality content that drives traffic and generates revenue for your business.
Content marketing requires a long-term approach, and it’s crucial to set clear goals. This will help you measure your success and make adjustments as necessary. The best way to set these goals is by identifying your audience and understanding their needs and interests. Then, you can create high-quality, relevant content that will attract new customers.
Creating great content is a combination of many skills, including copywriting, videography, and design. It’s also important to know how to optimize your content for search engines and social media. This will increase your visibility and help you rank higher in organic search results.
Successful content is created with a focus on the audience’s pain points, needs, and questions. It should also be entertaining and informative to engage your audience. It’s also important to stay current on popular topics and trends so that you can capitalize on them.
While content marketing is a time-consuming process, it’s worth the investment. It has been shown to increase website traffic, improve SEO, and drive revenue for businesses. Plus, it’s a great way to establish your brand as an expert in your field. So don’t hesitate to get started! Just remember to stick with a schedule and be consistent. You’ll see the benefits in no time.
Monitoring
Backlink monitoring is a crucial part of any successful SEO strategy. It allows you to identify and take action on broken links, helping you improve your search engine ranking. It also helps you stay on top of changes in the digital landscape, such as a shift in domain authority. In addition, it gives you insights into your competitors’ link-building strategies, allowing you to improve your own. To get the most out of your backlink monitoring, you should choose a tool that offers a comprehensive index and a clean, user-friendly design. It should also be compatible with Google Search Console, so that you can import your own backlink data into the tool.
While most backlink monitors claim to offer comprehensive backlink analyses, only a few really live up to their claims. These tools use professional web crawlers to find your backlinks and constantly recrawl them to identify any changes. They will also notify you of any dead backlinks and help you fix them. They will also give you an in-depth analysis of your backlinks, including status codes, custom URL ratings for each page, a page spam score, referring pages and domains, referring IPs, first seen, and more.
Another important aspect of backlink monitoring is identifying the referring domains that are most valuable to your website. This information is essential for determining your site’s Domain Authority (DA) score, which directly impacts your search engine rankings. A high DA score is often the result of a large number of quality backlinks from relevant referring domains. Therefore, it is critical to track both the volume and the quality of your referring domains.
The online landscape is dynamic, and websites frequently change ownership. This can affect the quality of your backlinks, causing them to be repurposed or redirected to low-quality content. It is critical to regularly review your referring domains and competitor’s backlink profiles, to ensure that they are promoting quality content that contributes to your SEO.
Whether you’re an experienced pro or just starting out, a reliable backlink monitoring tool is a must-have for any SEO campaign. These tools can save you time, money and effort by providing valuable insights into your SEO campaigns. In addition to allowing you to identify and repair broken links, they can also increase the visibility of your brand on search engines.