Home » Home Services
Category Archives: Home Services
How to Properly Perform Drywall Repair
Drywall Repair Las Vegas is one of those home maintenance tasks that can seem daunting at first glance, but a little patience and elbow grease go a long way. Addressing drywall issues promptly prevents minor problems from escalating to costly and time-consuming repairs.
Small holes such as nail or screw holes, dents, and snags are fairly straightforward to fix with a repair kit and drywall compound. Water damage, on the other hand, requires more in-depth repair work.
Drywall cracks are a common home problem. Some are harmless, while others indicate serious structural issues that must be addressed immediately.
Small cracks in drywall can usually be repaired with a spackle or drywall compound. A drywall patch kit can be used for larger holes. When a wall is being repainted, any cracks should be filled and smoothed before the next coat of paint. Cracks in drywall are also signs of other problems, like mold or water damage, which must be addressed before painting over them.
One of the most common causes of drywall cracking is settling or movement in the structure. If your building is new, this is normal and should be expected for a few years while the foundation shifts and settles. It is important to hire a professional for drywall repair as soon as you notice these cracks, as they will likely recur unless the underlying issues are corrected.
Other common causes of drywall cracks include temperature changes, aging materials, and structural overload. For example, if you hang heavy items on your walls, they can cause the drywall to crack. It is important to anchor the items to studs and use brackets where necessary.
Also, aging drywall can be susceptible to moisture which leads to swelling and separating from the wall. In this case, a new sheet of drywall should be installed as quickly as possible to prevent further damage.
If a crack appears in your drywall that is straight and thin, it may be caused by faulty or poorly installed drywall tape. It is important to replace any drywall tape with new strips after the crack has been repaired.
If your drywall is cracking in areas that are not near doors or windows, it could be a sign of a structural issue with the foundation of the house. These problems can get worse over time if ignored, and may require more extensive and costly repairs in the future. A building inspector can help determine the underlying cause and resolve it before it becomes more problematic. This will minimize future costs and damage to the home or building.
Holes
Small holes from nails and screws can be patched with drywall spackle or joint compound. Using a putty knife, apply the compound in a crisscross pattern. When dry, lightly sand and apply another coat. It may take several coats to fully cover the hole. Once the patch is smooth and even with the rest of the wall, feather the edges to blend them. This will make your repair look professional rather than a patch.
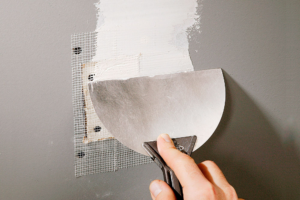
Larger holes require a different approach. Use a stud finder to locate and mark the studs on either side of the hole. This will help you avoid nicking electrical wires or plumbing as you work. Cut a replacement piece of drywall to the same size as the hole and secure it with furring strips and drywall screws. Apply joint tape and mud, or “feather” the seams, just as you would when installing new drywall.
Before you do anything to the drywall, be sure to clean the area and remove any loose debris. Leaving drywall dust on the surface will cause your patch to adhere poorly and it will not look neat and even under a coat of paint.
Whether you’re repairing a nail pop or larger hole, it’s important to start with a clean surface. Be sure to sand the area to smooth any rough spots and wipe away any dust with a damp cloth. Then clean the hole with a mild solvent to remove any dirt or grease that might prevent your compound from adhering well.
A good place to start is with a repair kit that includes both a patch and a bag of joint compound. Most kits can be purchased at your local hardware store. Alternatively, you can use a sheet of drywall and joint tape to create the same effect. Just be sure to follow the instructions carefully and carefully avoid nicking any wiring or plumbing. If you do, you may need to re-cut the piece of drywall. You should also be careful not to cut through the underlying framing of the house or it may collapse.
Nail Pops
There’s nothing quite like a smooth coat of paint, but sometimes drywall issues can pop up that interrupt that perfect plane. One such issue is known as a nail pop, or protrusions that appear on the wall when nails used to secure drywall pull away from their original positions. These can occur due to various reasons, from changes in humidity and temperature to the wood framing of your home shifting over time.
Nail pops can be a bit of a nuisance to deal with as they spoil the overall appearance of a room and may catch on clothing or other objects if not fixed. They can also be a sign of larger structural problems with your house, such as doors that stick or cracks around windows and doors. If you notice a lot of nail pops throughout your home, it’s worth investigating whether these could be signs of a foundation issue that requires further investigation by a professional in Vaughan.
The most common reason for nail pops is a change in humidity and temperature, which can cause the lumber used to build your home to expand slightly. This expansion can put pressure on the nails holding the drywall, causing them to move and loosen the joint compound covering them. Once the joint compound becomes exposed, it can easily come off and reveal a nail head.
When a nail pop appears, you can easily fix it by driving the nail back into its original position. To do this, first locate the nail by looking for a small dimple on the surface of your wall. Stand on a step ladder or stool and press gently into the dimple to see if it moves. If it does, use a drywall screw to drive the nail in again, but only to a point that is recessed slightly beneath the surface.
Once the nail or screw is re-set, apply a thin layer of spackling over the spot and let it dry. Then sand the patched area lightly to remove any excess spackling and make it smooth again.
After sanding, it’s important to prime the entire surface of your wall before applying a new coat of paint. This will help ensure that the spackled spot matches the rest of your wall in both texture and color.
Water Damage
Drywall is a porous material that absorbs and holds moisture, making it susceptible to mold, mildew or crumbling if not treated properly. If your home suffers from a flood, hurricane, burst pipes or other water-related event, the affected drywall should be replaced. It’s important to be able to identify the source of the water and eliminate it before beginning repairs.
Discolored water stains on walls are typically the first sign of damage. Other warning signs include a musty smell, wallpaper bubbling or paint that is soft to the touch. The underlying drywall should also be carefully examined; if the material is sagging or buckling, it will need to be completely removed and replaced.
Once you’ve identified the area of drywall that needs repair, it is essential to clean the walls and ceiling thoroughly. Remove any sagging or buckled sections and dry the remaining drywall with fans, dehumidifiers, and open windows to help speed up the process. It’s also a good idea to wear gloves and masks when working with any raw materials, as mold spores can easily be released during the repair process.
After the drywall has been cleaned and dried, it’s time to prep the surface for repair. Begin by putting down drop cloths or tarps to catch any drywall pieces, dust and debris that may fall during the process. Then, using a power drill, remove the drywall screws that held the old sheet to the wall studs. Depending on the severity of the damage, you may need to remove the entire section of the wall and replace it.
If the water damage is severe, the drywall should be completely removed down to the studs and then sanded down, allowing for a smooth surface that will be ready for new drywall to be installed. Once the drywall is dry, it’s essential to use a primer to protect the newly repaired areas from future moisture and mold.
As a general rule, any time physical damage occurs to your home’s walls or ceilings, drywall repair will be necessary. Whether the damage is from a small hole, mold or water damage, it’s crucial to have a drywall company that you can trust to perform quick and effective repairs.