Arthur’s Roofing installation is a labor-intensive process that requires special skills and equipment.
First, the old shingles are removed and the plywood base is inspected for damage. Then, ice and water protection is placed, along with new drip edge and replacement wall flashings.
There are many roofing materials to choose from, each offering different protection and aesthetic appeal. A roofer can walk homeowners through all the options that fit their goals, architecture and budget.
Roofing materials include shingles, flashing and gutters. The right shingle material will provide durability and weather resistance that matches the climate of your region.
Other roofing components include drip edges, venting and ridge caps. These features are installed to prevent water damage. Drip edges are channels that collect rainwater and channel it away from the fascia and soffit area, protecting against moisture buildup. Ventilation systems like ridge vents, soffit vents and powered exhaust fans promote airflow in the attic space to avoid moisture buildup in the eaves.
The roofing contractors you hire to complete your re-roofing project should be equipped with the proper tools and safety equipment for the job. Pry bars can be used to remove nails, staples and other fasteners from the old roof decking. Hard hats, protective eyewear and gloves shield the workers from falling debris and dirt.
Rolled roofing is another option that provides a low-cost, utilitarian look for flat or sloped residential roofs and outbuildings like sheds. It consists of long rolls of asphalt-impregnated and mineral granulated material rolled into strips that overlap each other. It can be installed on bare wood sheathing or over a layer of felt. The felt protects the sheathing against condensation and leaking.
Preparation
Roofing contractors need a clear workspace to work safely and efficiently. To prepare your home for a new roof, remove outdoor items like patio furniture and lawn ornaments from the area around your house to prevent them from being damaged by dust or debris during the roofing process. It is also a good idea to move any vehicles that are kept in the garage or other outside areas away from your home during the roofing installation, as this will help keep them out of the way and safe from construction debris.
Inside your home, the roofing process can create vibrations that could damage framed photos, paintings and other wall hangings. Wrap any valuables in blankets or bubble wrap and place them in a safe spot until the roof is finished. Backup any computer files, as power tools can cause electrical surges that could affect the integrity of your data. Take down any light fixtures prone to vibration damage and put away fragile decor items that could fall during the project.
Ask your roofing contractor to inspect your gutters and make sure they are clean of leaves and other debris. They should also inspect the flashing around chimneys, skylights and other roof protrusions, as well as the ridge vent. A professional will know how to replace these areas with proper flashing and sealants to protect your home from water intrusion.
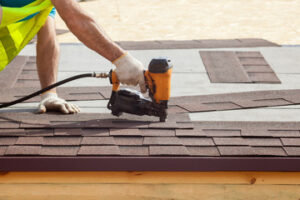
Shingles
Shingles are the main part of your roof, and they provide the protection that keeps your home safe from the elements. They can be installed on a variety of roof types and styles, such as flat, pitched, or sloping. There are also various color and design options available to fit your style, whether you prefer a classic 3-tab, architectural, or premium shingle.
When installing shingles, it’s important to follow the roofing installation instructions provided with your materials. This ensures the best results, as well as protecting your roof and helping to maintain its warranty coverage. If you’re working with a new roof, it is a good idea to have someone nearby to help you get the material up onto the roof and unrolling properly. You may need to create a hoist system or use a ladder extension to reach certain areas of your roof.
Start with the first course of shingles (called a starter course). Cut off the tabs from a full shingle and place it on the bottom of your roof, overhanging the drip edge by about 1/4 inch. Nail it in place with four nails per shingle, being careful not to nail into the wood sheathing.
Continue to lay down shingle courses in overlapping rows, making sure each one overlaps the next by at least half. Check the roof for any damage and make repairs as needed before moving on to the next section of your roof.
Flashing
Flashing is material that’s installed at critical points where water could leak into walls or roofs. These include valleys where two different roof slopes meet, wall-roof intersections, and projections like chimneys, dormers, and skylights. Flashing helps prevent leaks in these areas and directs rainwater away from the structure.
Generally, flashing is made of either metal or rubber, though it can also be made from plastic. The type of flashing used will depend on the material chosen for a roof and other factors such as cost considerations, architectural design, and compatibility with adjoining materials.
The most common flashing material is galvanized steel, which works well with metal roofs and protects against corrosion. Lead flashing is also available, and it’s considered to be one of the most durable types of flashings due to its naturally long-lasting resistance to moisture and changing exterior temperatures.
When laying down flashing, it’s important to follow the manufacturer’s instructions for installation. For example, pipe flashings should be placed carefully around soil stacks to avoid leaking. It’s also necessary to use nails sparingly when securing flashings, as too many can cause the flashing to break down. When nailing the flashings, be sure to place a dab of roofing cement over each exposed nail for extra protection against leaks. Corner flashing is also sometimes required, and it can be made by bending a piece of standard step flashing into a “L” shape. This is accomplished by using tin snips to cut along the center fold.
Underlayment
A critical layer between the roof deck and the roof covering, underlayment protects the home from moisture that would otherwise penetrate the roof surface. Moisture penetration can cause a host of issues, including leaks, wood rot, mildew and mold. There are several types of underlayment available, from asphalt-saturated felt to rubberized asphalt to non-bitumen synthetic underlayments.
Felt underlayment is one of the oldest and most common types of underlayment. It is made from organic paper or fiberglass mat that has been saturated with asphalt and comes in two standard weights, 15 and 30 pounds per hundred square feet. It is typically installed in courses and requires a selvedge edge along the edges where rolls overlap.
The underlayment helps to create a strong, watertight seal at the joints of the rolls and is also designed to help the rolls stay in place during installation. It is also available with a non-skid surface, which makes it easier for roofers to walk on during installation.
The underlayment is usually designed to last as long as the outer roofing material and is resistant to fungal growth, UV damage and tear. It is also a barrier against moisture, which makes it an important feature for homes in wet climates. However, it’s important to note that using certain types of synthetic underlayment may void the warranty of some roof covering materials. It’s best to consult your manufacturer’s recommendations before choosing a particular underlayment for your project.
Cleanup
A thorough and professional cleanup after a roof installation is crucial to the success of the project. The removal of old shingles and materials can leave behind a variety of unsightly debris on your lawn, sidewalks, driveway, and neighboring properties. These materials may contain nails and other sharp debris that can pose a safety risk for anyone walking barefoot or pets roaming the area. They can also block gutters and downspouts, which can lead to water accumulation in the roof that can damage the new shingles.
Your roofing contractor should outline their cleanup process in the contract, ensuring that this is a priority for the crew. This will be a significant factor in their ability to deliver on their commitment to provide you with a clean, finished project. In addition, your contractor will provide you with clear communication channels so you can understand how they will perform their work.
Prior to the roofing job starting, your contractor will probably have a dumpster delivered and placed on your property for waste disposal. You should prepare your yard for this in advance by moving vehicles from your driveway and removing any outdoor furniture or potted plants that could be damaged during the roof tear-off process. Having your lawn mowed and shrubbery trimmed will help to ensure that loose shingle debris makes it into the dumpster and not onto your property. Your roofer will also likely use a magnetic sweeper to search for and collect any stray nails that don’t make it into the trash.